Art of Success
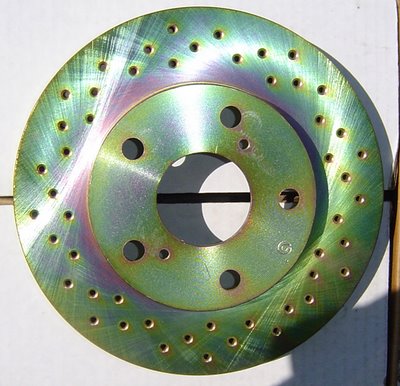
Mission: Replace front rotors on '97 Camry LE- Mission Log 8.09.2006: New Brembo cross drilled rotors arrived in mail.
- Mission Log 8.10.2006: Bought C-clap, rubber mallot, and brake degreaser to run the operation.
- Mission Log 8.11.2006:
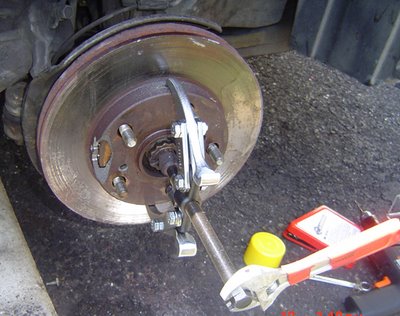
- 7:30pm -- Proceeded with operation. Took off calipers, pads, and brace. Attempted to take off rotor, but it didnt budge. Applied WD-40, still remained stuck.
- 8:30pm -- Put everything back as it was.
- Mission Log 8.12.2006:
- 6:30am -- Attempted again. Rotor didnt budge.
- 7:30am -- Put everything back as it was.
- 7:00pm -- Attempted again. Implemented advice to use bolts as a lever. Driver side rotor came off in 5 mins. Proceeded to passenger side. Bolt broke and got stuck in rotor. Attempted to hammer it with a mallot, and other tools. Rotor didnt budge. Hammered it with a real hammer. Sparks flew, but rotors didnt budge. Emptied WD-40 bottle on rotor. Used caliper bolt to lever it off. Threads on rotor got messed up.
- 8:30pm -- Left everything as it was after sunset.
- Mission Log 8.13.2006:
- 9:00am -- Attempted to hammer rotor off with all my force. Hammer lost its head. Rotor has deep dents, but didnt budge. Car is lowered onto cinderblocks. Car jack used to push off rotor, but entire suspension moves as jack is expanded.
- 10:00am -- Went to AutoZone and Home Depot to call for rienforcements. New hammer with graphite handle, 5 ton jaw clamp, bolt removing drill bits, two 8mm bolts, penetrating oil, WD-40.
- 11:00am -- 5 ton jaw clamp's diameter is too small to grab rotor. Bolt removing drill bits are used to remove broken stuck bolt. New 8mm bolts are free turning because treads are completely messed up. Penetrating oil is applied.
- 12:30pm -- Drill is called in to drill slots on side of rotor. jaw clap is attached to rotor. Penetrating oil is applied. Jaw clamp is attacked.
- Penetrating oil is applied again. Pressure is put on and left for about 10 mins. More pressure is put on. Rotor cracks from pressure.
- 2:00pm -- New slots are drilled on opposite ends. 5-ton jaw clap is re attached on new slots. Pressure is put on untill jaw clamp cannot be tightened anymore.
- 3:00pm -- Rotor's exterior is bending outward, but inner circle is still rusted stuck. More penetrating oil and WD-40 is applied. 18" long flat head screw driver is used to lever rotor off from cracked area. in three levering attempts rotor "POPs" off.
- Rotor is surrounded and beaten to submission.
- 3:15pm -- Brand new Brembo rotor is brought to its rightful place :)
Reflections
I never realized that replacing the rotors on a car would take this much effort. Everytime an idea didnt work frustration came upon me, but I wasn't going to submit to a some metal. I started this mission, I was going to complete it.
When i found out that the 5-ton jaw clamp didnt fit in the beginning, I felt like quiting. I remembered a story my friend told me about when he was in the marines. When they do training in the marines, at one point you have the oppurtunity to become a special forces member. Many soldiers take up the challenge, but many quit. There is a bell that they have to ring if they quit...
...one thing came to mind. quiting is a choice. Real men dont quit. I chose to be patient and push forward. I outlasted the rotor's stubborn attitude and successfully got it off the car. I ended up spending more money in supplies and time than I would have at the mechanics, but the lessons learned were priceless. That challenges overcome were priceless.
Giving up is a choice, keeping patience is a choice. Which one you choose...is up to you.
I have to give a shout out to the guys at ToyotaNation Forums for thier help and support, and my dad for keeping patient with me for breaking some of his tools :p
Thanks guys :)


10 Comments:
MashAllah beta.
wow glad you got it done but it makes me wonder...what the heck got your rotor so stuck onto the car!
i have those brembos! i hope you cleaned em out with brake cleaner otherwise they'll smoke for a while. Although im sure its ok as thats what i did. I know better now tho.
I have a layer of black paint on the center of my rotors to prevent rust, i see yours doesnt have it. oh well brembo is good, no worries.
HAVE FUN! make sure to break stuff in properly.
what got the rotors so stuck...
...oxygen + metal = sturbborn rotors
Yea...i cleaned the rotors quite well. As for the layer of paint...thats not a bad idea. Maybe when i do my rear brakes (after they wear out) ill do that to them.
Im lovin the stopping power :)
Things to complete on car next:
- Fix -wiper fluid tank
- Replace broken rear bumper
- Fix trunk tail lights (mechanic)
Target: 2 weeks
Might do:
- Replace cracked driver side tail light housing
- get new interior floor mats
- New tires and hubcaps
- new suspension (car bounces a lot)
- replace rear drums with disc brakes
- interior wood trim
- Detail interior
- Leather seat covers
- Paint job on exterior, and remove all dents/dings
^^^ Yaar, why dont you just get a new car.
its much cheaper to fix it :)
oh...i forgot to add:
- interior dashboard led fix
bro, my advice is to fix the car so that it runs. save up all your money and get a decent car in the future.
but good job. mashaAllah!
the car is already a descent car. Its runs great.
^^^ umm... sure... thats why it randomly stopped on the highway and died that day at the sunday school picnic.
I had the engine replaced. It was under warrantee.
Post a Comment
<< Home